
How to add a new kernel to your Jupyter Notebook
In this blog post, I’ll tell you how to add a new kernel to your Jupyter notebook in just 3 simple steps.
Step 1: Install virtualenvwrapper
Follow this link and
install virtualenvwrapper. Virtualenvwrapper is an extension to
virtualenv, which provides additional commands to manage your virtual
environments. Make sure you install it in your PATH by following the
instructions.
To verify your installation, use workon. This lists your current virtualenvs
installed with virtualenvwrapper, and should return nothing.
$ workon
tmp
I have one virtualenv, tmp, installed with virtualenvwrapper.
Step 2: Create a new virtualenv called data-science
Create a new virtualenv with mkvirtualenv.
$ mkvirtualenv data-science
Your terminal should now have a data-science prompt in front of it. This
indicates that you are in the data-science virtual environment.
(data-science) $ echo "Hi"
Hi
To exit the virtualenv use deactivate
(data-science) $ deactivate
$ ...
To work on your virtualenv use workon
$ workon data-science
(data-science) $ ...
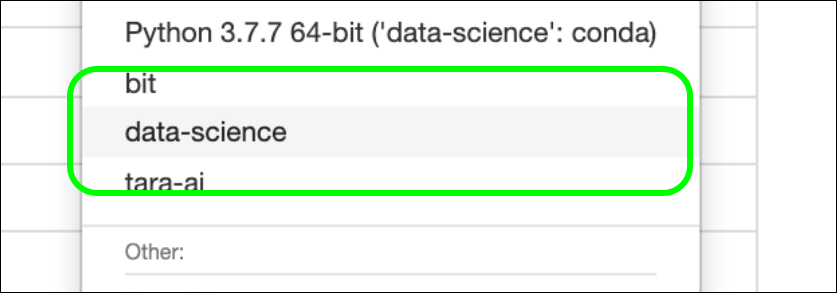
Step 3: Add the kernel to your Jupyter notebook
Finally, while you are still in your virtualenv data-science, add your
kernel to your jupyter notebook with the following command.
(data-science) $ ipython kernel install --name “data-science” --user
Once this step is complete, your new kernel will appear in your jupyter notebooks! Note that you do not have to be in the virtualenv to access the new kernel.
Conclusion
And that’s how you add a new kernel in your jupyter notebook in 3 simple steps.
For the really lazy people who just want to copy paste something and slam it in their terminal, this one is for you.
mkvirtualenv data-science
workon data-science
ipython kernel install --name “data-science” --user


Comments